

Mobile App Development field has reached newer heights in the last year or so. There is two primary OS for mobile app development – Android & iOS. Both these OS have played a significant role in the growth of the mobile application. Out of both these OS, Android have gained massive popularity among the audience. In recent years, there has been a lot of advancement in the Android ecosystem.
Nowadays, Android can also work with Big Data platforms like MongoDB or Hadoop. As a developer, if you’re looking for a serverless platform, then opt for MongoDB Stitch. It provides you with rich features and, it is also cost-effective. So, why not give it a try.
In addition to basic features, it also provides functions such as service webhook & user authentication. It comes with MongoDB Atlas, a cloud-based data storage solution. In this blog, we’re going to provide you with a step-by-step guide to create a note-taking app for Android with the help of MongoDB Stitch & MongoDB Atlas.
So, let’s get the show started, right here, right now.!
Prerequisites For App Development
- Android Studio 1 or higher
- a MongoDB Atlas account
- a device or emulator running Android 5.0 or higher
Steps To Create A Note-Taking App For Android
Step 1: Creating A Stitch App
First of all, you will need a Stitch app. With the help of that service, you will be able to utilize the services that Stitch platform provides you for Android project.
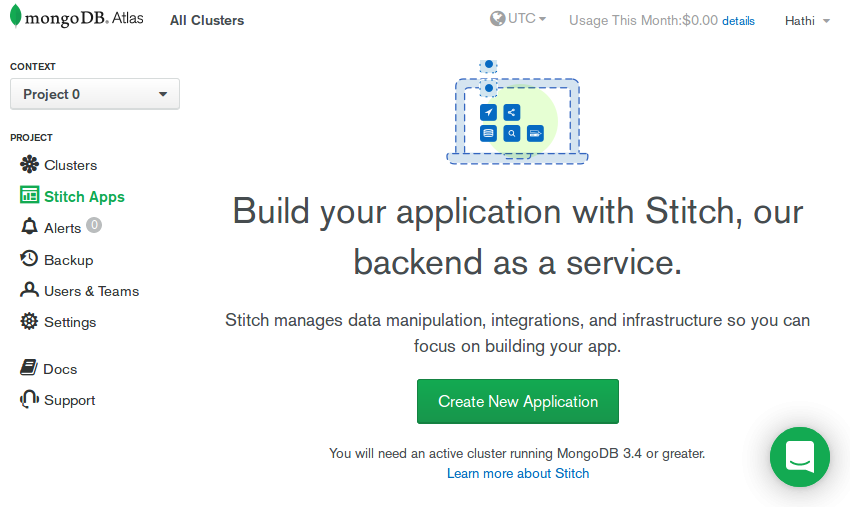
Now, login to MongoDB Atlas account and navigate to Stitch Apps section, as shown in the screenshot below.
 After moving to Stitch Apps section, press Create New Application button. Here, the app will ask you to give a name for your application. You also need to select one MongoDB cluster from the dropdown as shown in the screenshot below.
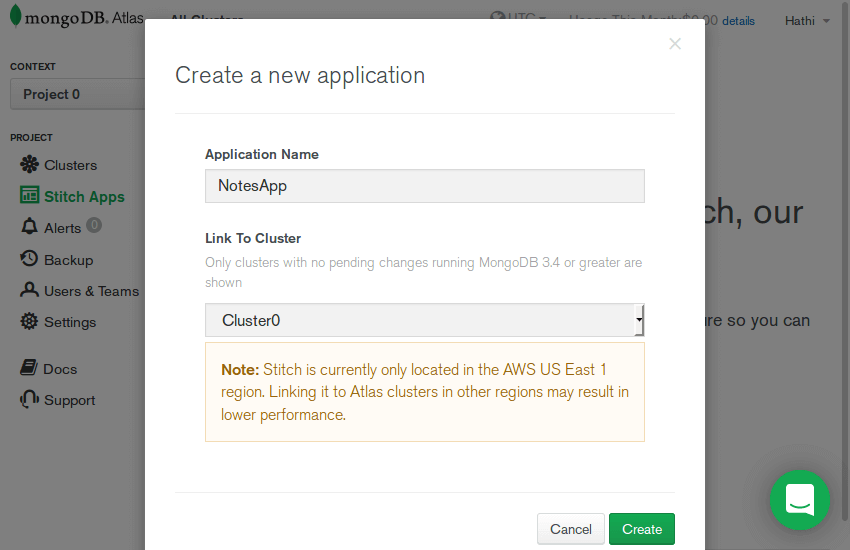
After the application gets ready, move to the Clients section and switch to the Java (Android) tab. It will help you to find the app ID. So, note down that. It will come handy later on.
Step 2: Authentication Setup
For authentication purpose, here we are going to use Google’s services. It means you will allow the users to log in to the app using their Google accounts.
For setting up authentication from Stitch’s admin console, you need to wait for a little period. In between, you have to note down essential details from the authentication provider.
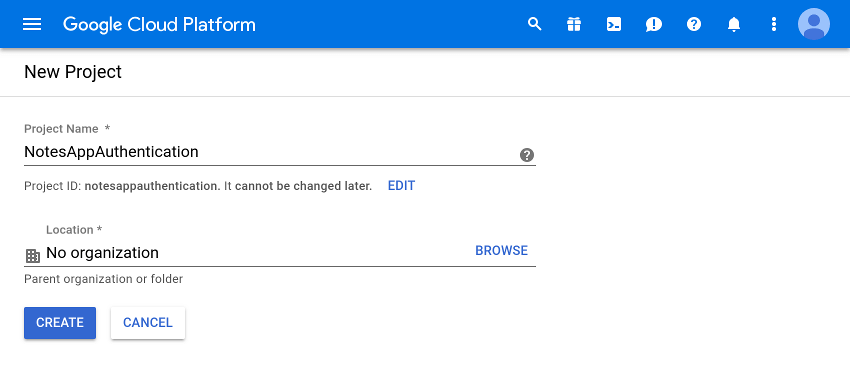
For that purpose, log in to your Google account and then, navigate to Google Cloud Platform API Dashboard. Now, click on Create Project, which will create a Google Cloud project.
Here, you need to assign a name to your project. So, complete the formalities and then, click on the Create button as shown in the screenshot below.
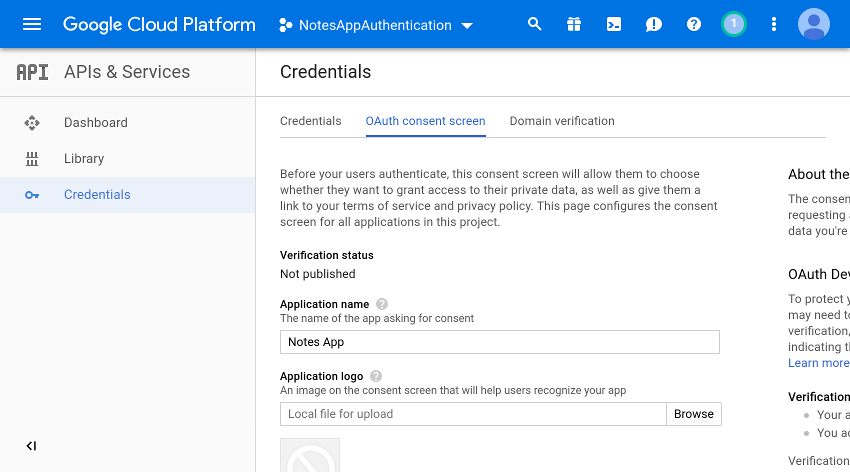
 After the project gets ready, navigate to Credentials section and open the OAuth consent screen tab. Here, you need to fill Application Name field as shown in the screenshot below.
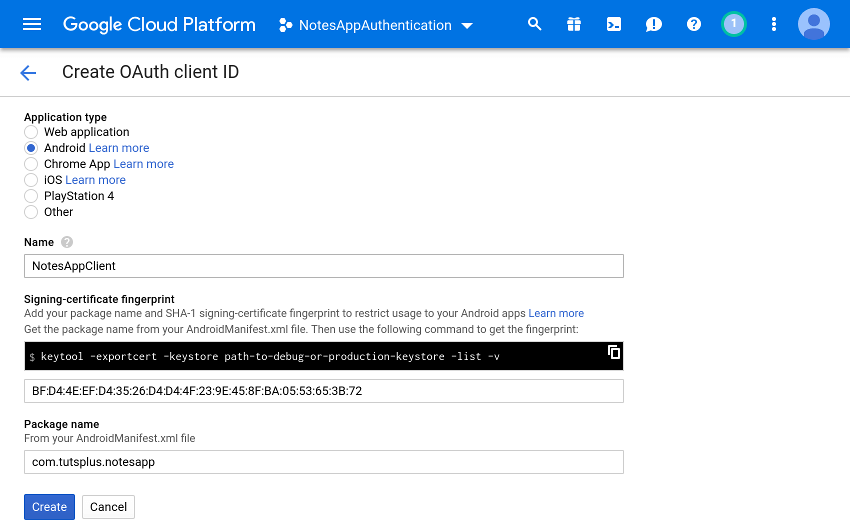
After completing the details, click on the Save button. Now, press Create credentials button & select OAuth client ID option. In that option, pick Android as the application type.
Here, you need to enter the name of the package for the Android app and SHA-1 fingerprint. For that purpose, open a terminal and run the following command:
keytool -exportcert -alias androiddebugkey \

-keystore ~/.android/debug.keystore \

-list
Copy this code and paste into the form.
Now, complete the procedure by clicking the Create button as shown in the screenshot below.
Now, Google Sign-In will get enable for the Android app. It just that you need to provide permission from Stitch. For that purpose, press Create credentials button & choose Web Application as an application type.
When you get asked to enter redirect URI, use this link: https://stitch.mongodb.com/api/client/v2.0/auth/callback
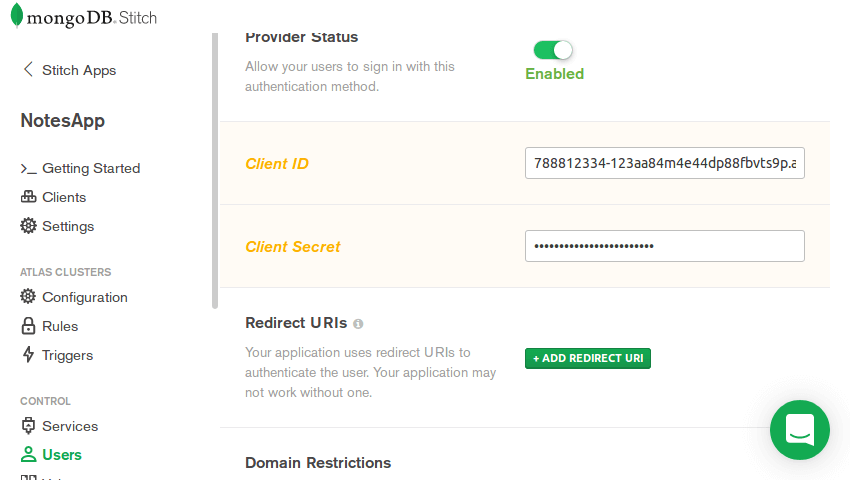
Now, when you click the Create button, you will see two strings – a client ID and a client secret. Note down both and navigate to Stitch admin console as shown in the screenshot below.

In the console, navigate to the Users section. In that, move to Providers tab and select Google. Here, you will get asked to enter the Client ID & Client Secret, as shown in the screenshot below.
Step 3: Adding A Rule
The app users must not be able to access other’s note. Therefore, adding a rule becomes essential. For that purpose, move to the Rules section and press the Add Collection button.
Now, it’s time to name your MongoDB database and also specify the collection for the storage. Here, we have named our database notes_db and collection notes.

Now, select ‘Users can only read and write their own data’ rules template. It will align well with your app’s requirements.
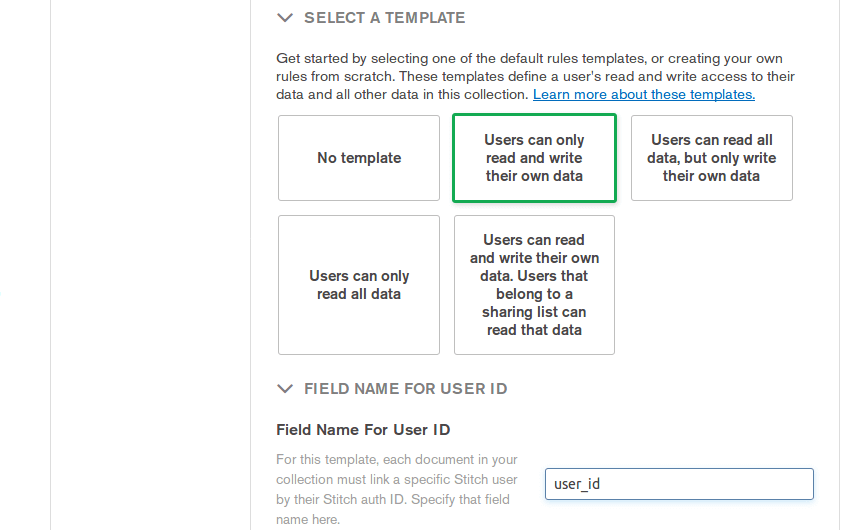
For finishing the things off, click on the ‘Add Collection’ button.
Step 4: Configuring An Android Project
Now, move to Android Studio & create a project with an empty activity. Be careful about matching the package name with the one you assigned earlier.
For utilizing the Stitch SDK in the project, you need to add the following dependency in build.gradle file.
implementation 'org.mongodb:stitch-android-sdk:4.0.5'
To allow Google Sign-In, you need to add a dependency for Google Play Services.
implementation 'com.google.android.gms:play-services-auth:15.0.1'
You will also require material design widgets. So, for that purpose, add the following dependencies in the app.
implementation 'com.android.support:design:27.1.1'
implementation 'com.android.support:cardview-v7:27.1.1'
implementation 'com.afollestad.material-dialogs:core:0.9.6.0'
Finally, add Stitch application’s ID and the client ID in strings.xml file.
<string name="stitch_client_app_id">YOUR_APP_ID</string>
<string name="google_client_id">YOUR_CLIENT_ID</string>
Step 5: Create A Layout
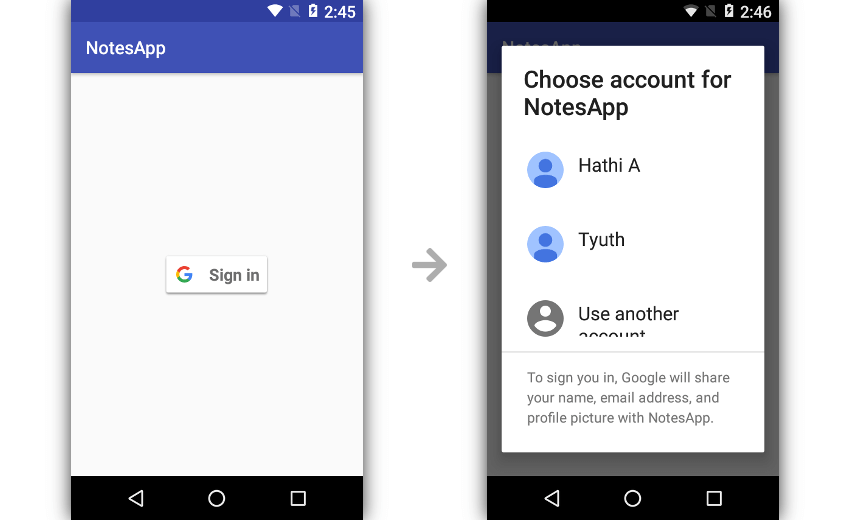
When you’re making a note-taking app, you should involve the sign-in process. As soon as the user opens up the app, he/she should see the Sign-In button.
For that purpose, you can use the `SignInButton` widget in the main activity’s layout.
<com.google.android.gms.common.SignInButton
        android:id="@+id/sign_in_button"
        android:layout_width="wrap_content"
        android:layout_height="wrap_content"
        android:layout_centerInParent="true"/>
After the sign-in, you need to redirect the user to another activity. It comprises a widget called ListView for displaying user’s notes and FloatingActionButton for creating a new note.
Thus, create an empty activity and add the following code to its layout XML file.
<RelativeLayout xmlns:android="http://schemas.android.com/apk/res/android"
    android:layout_width="match_parent"
    android:layout_height="match_parent"
    android:padding="16dp">
    <ListView
        android:layout_width="match_parent"
        android:layout_height="match_parent"
        android:id="@+id/notes_container"
        android:dividerHeight="16dp"
        android:divider="@android:color/transparent"/>
    <android.support.design.widget.FloatingActionButton
        android:layout_width="wrap_content"
        android:layout_height="wrap_content"
        android:layout_alignParentBottom="true"
        android:layout_alignParentRight="true"
        android:src="@drawable/ic_add_black_24dp"
        android:id="@+id/add_note_button"
        android:tint="@android:color/white"/>
</RelativeLayout>
Each item of ListView will be a note. Now, create a new layout XML file named layout_note.xml and add the following code to it.
<android.support.v7.widget.CardView
    xmlns:android="http://schemas.android.com/apk/res/android"
    android:layout_width="match_parent"
    android:layout_height="match_parent">
    <TextView
        android:id="@+id/note_text"
        style="@style/TextAppearance.AppCompat.Body1"
        android:layout_width="match_parent"
        android:layout_height="wrap_content"
        android:padding="8dp" />
</android.support.v7.widget.CardView>
Step 6: Implementing Google Sign-In
Whenever the user clicks on the Sign-In button, you should call Google’s sign-in workflow. So, in an activity, add the on-click handler.
Now, create a `GoogleSignInOptions` object for default sign-in option. You must also involve the Stitch app into the sign-in process.
For that purpose, you can utilize the following coding snippet.
val signInOptions =
    GoogleSignInOptions.Builder(
        GoogleSignInOptions.DEFAULT_SIGN_IN
    ).requestServerAuthCode(
        getString(R.string.google_client_id)
    ).build()
Now, it’s time to create the `GoogleSignIn client. For that purpose, call the `getClient()method and pass `GoogleSignInOptions` object. Using the client, you can start the workflow for sign-in.
For making it a reality, use the following coding snippet.
val signInClient = GoogleSignIn.getClient(
        this@MainActivity, signInOptions
)
startActivityForResult(
        signInClient.signInIntent,
        1 // request code
)
For getting the results of the activity, you need to override the `onActivityResult()` method. Inside that method, accessing the Intent object is vital.
override fun onActivityResult(requestCode: Int,
                              resultCode: Int,
                              data: Intent?) {
    super.onActivityResult(requestCode, resultCode, data)
    val signedInAccount =
            GoogleSignIn.getSignedInAccountFromIntent(data)
}
Whenever a user fails to sign-in, you have to handle an exception. For that purpose, you can use the following lines of code.
if(signedInAccount.exception != null) {
    Toast.makeText(this,
            "You must sign in first", Toast.LENGTH_LONG).show()
    finish()
    return
}
If the Sign-In is successful, then you have to handle server authentication. For that purpose, you can create a `GoogleCredential` object. Now, pass the object to `loginWithCredential()`method. After that, you can register and log into the app.
Once you successfully complete the method, the app will move to second activity. For that purpose, utilize the following coding snippet.
Stitch.getDefaultAppClient().auth
    .loginWithCredential(
        GoogleCredential(signedInAccount.result.serverAuthCode)
    )
    .addOnSuccessListener {
        // Open activity that shows the notes
        startActivity(
            Intent(this@MainActivity,
                    NotesActivity::class.java
            )
        )
    }
Now, you should be able to use the Google Account for log-in purpose.
Step 7: Adding Notes
In the second activity, you will need both Stitch client and a MongoDB Atlas client. The former for user authentication ID and the later for the read/write operation on MongoDB Atlas cluster.
So, now add them as a private field, as shown in the codding snippet below.
private val stitchClient = Stitch.getDefaultAppClient()
private val atlasClient  = stitchClient.getServiceClient(
                                RemoteMongoClient.factory,
                                "mongodb-atlas"
                          )
When the user presses the floating action button, you should display a dialog box that asked them to type the notes. That’s where the following coding snippet comes into the picture.
add_note_button.setOnClickListener {
    val dialog = MaterialDialog.Builder(this@NotesActivity)
            .title("New Note")
            .input("Type something", null, false,
                { _, note ->
                    // More code here
                }
            ).build()
    dialog.show()
}
Inside the event handler, you have to access the note. For storing the note in MongoDB Atlas cluster, you should put in a MongoDB document.
You should also make sure that the note is only visible to the user who created it. The document must include the `user_id` field. The following code shows how to create a document.
val document = Document()
document["text"] = note.toString()
document["user_id"] = stitchClient.auth.user!!.id
The document is now ready. So, it’s time to put the notes into the collection. Here’s how you can proceed for that purpose.
val collection = atlasClient.getDatabase("notes_db")
                            .getCollection("notes")
collection.insertOne(document).addOnSuccessListener {
    Toast.makeText(this@NotesActivity,
            "One note saved", Toast.LENGTH_LONG).show()
}
Now, if you run the app, you should be able to save a note.
Step 8: Displaying Notes
So far, we have written a code for adding the notes. Now, it’s time to display the notes, and for that purpose, you need to fetch all the documents in `notes collection.
First of all, create a new method to display the notes.
private fun showNotes() {
    // More code here
}
Inside this method, you should call the `find() method on `notes collection. For that purpose, bring `into() method into play and use the following coding snippet.
val notes = mutableListOf<Document>()
atlasClient.getDatabase("notes_db")
        .getCollection("notes")
        .find()
        .into(notes)
        .addOnSuccessListener {
            // More code here
        }
Now, in the on-success listener, create an instance of `ArrayAdapter` class. It will help you to render the list of notes. For that purpose, use the following lines of code.
val adapter = ArrayAdapter<String>(this@NotesActivity,
        R.layout.layout_note, R.id.note_text,
        notes.map {
            it.getString("text") // Extract only the 'text' field
                                // of each document
        }
)
After the adapter is ready, you can use that by using the following code.
notes_container.adapter = adapter
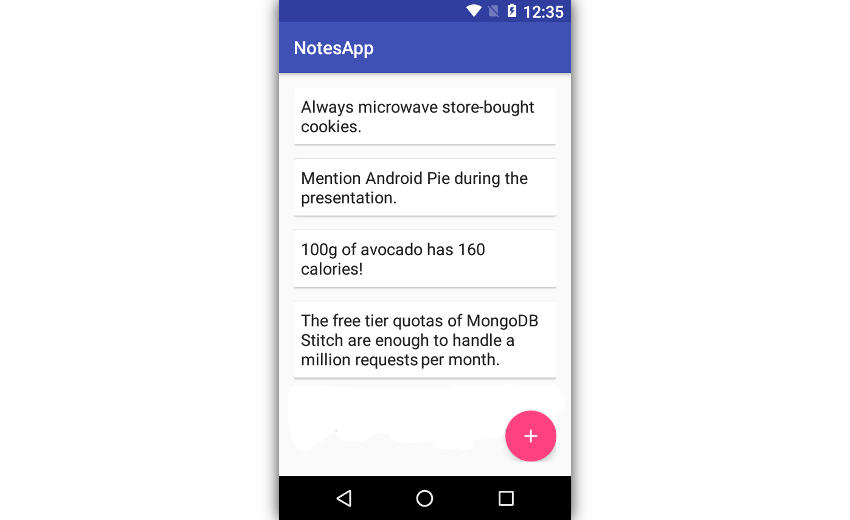
After making all those changes, if you run the app again, you can view both new notes and also view the existing ones.
Conclusion
Nowadays, when there is a lot of demand for Android application development in the market, it becomes vital for all of you to be aware of its latest trends.
With the advancement in technologies, Android can now work with Big Data platforms like MongoDB & Hadoop. Therefore, you need to have an idea about its working.
Taking this idea into consideration, here we have provided you with a step-by-step guide which will help you to create a note-taking app for Android with MongoDB Stitch.
We hope you had a great time reading this article. If you’ve any question or suggestion related to this blog, then feel free to ask it in our comment section. Thank You.!