

How To Create A WordPress Staging Site For Testing?
Have you been wondering, how are businesses able to upgrade their website so flawlessly?
Consider a scenario, you modified your website to enhance its performance or add a feature in order to add more value to the user experience, hence boost traffic. But when you made your website live, you saw a completely different aspect of it: a slow, error-prone website.
This isn’t just an assumption, it happens to a lot of people, causing a massive drop in website traffic. Actually, 88% of users are less likely to return to a website after a bad experience (XP)- Webfx.
If you have a WordPress website and you’re facing the same situation or want to prevent this from happening to you in the future, the best way is to create a staging website.
Website staging allows WordPress users to make significant alterations to their websites without affecting them. Furthermore, it allows you to detect all types of bugs, errors, and other critical issues without putting your site at risk. The best part of the staging website is that it allows you to restore it from a backup in case something goes wrong with a change. The flexibility to explore and try new things on your website opens new horizons of improvement.
What is a Staging Website?
A Staging website is a replica of your actual website on which you can try and test the modifications before implementing them on your original live website. To put it in simple terms, do you remember using the rough sheet during your mathematics examination to do multiple calculations, in order to prevent the overwriting on your exam sheet and losing clarity and understandability?
The staging websites work in the same way, allowing you to test and try out the new changes to your websites before making them live. Doing this, you can find out the error and loopholes in your new addition, if any, in the staging site itself, hence preventing your website from breaking. Once your changes have been approved, you can push these changes to live anytime.
So what is the best way to build a staging environment for your WordPress site?
In this step-by-step guide, we will help you create a staging environment for your WordPress website and discuss the most effective and popular ways to do the same.
3 Most-Effective Ways to Create a WordPress Staging Site
WordPress is a great platform for building your website. It is however a dynamic system and can be a little complicated to work with, especially when introducing a change to your website. That is why it is important to have a staging site to develop your site on, without affecting your main site.
Here we will show you how to create a staging site for your WordPress website. WordPress staging sites can be created in a variety of ways, but we have chosen the most popular ones for you. Let’s dive in-
- Create your WordPress Staging Website with Web Host
Perhaps, the most effective way to create your WordPress staging website is to create it through your WordPress hosting provider. Several hosting providers enableintoSettings the users to create staging websites; the most popular ones among these are Bluehost, Siteground, and WPengine.
A benefit of this approach is that, by offering the convenience of one-click staging, the hosting provider simplifies the staging process for you.
If you have your website hosted on Bluehost, let’s say. Then following these instructions will allow you to set up your staging site:
How to Create a Staging Site on Bluehost?
Step-1: Log in to your WordPress website, open the Admin panel and click on the staging option.

Step-2: Click on the ‘Create Staging Site’ button to create your WordPress staging website. Once this has been completed, your staging website details are displayed along with the success message in a new window. It’s now time to go to your staging site, where you can make all the modifications you want.

Step-3: As soon as you have determined the changes you want to incorporate into your website, you can push them live. To push changes from your staging site to the live site, go back to the Staging page under the Bluehost option and select the desired deployment option.

Once you confirm the deployment action, Bluehost begins the process. After some time you can visit your live website to check out the changes.

Similarly, SiteGround and WP Engine also avail one-click staging facility. Therefore, if you are using either of them, here are the steps you need to follow to set up a staging site for WordPress.
How to Create a Staging Site on SiteGround?
Step-1: Login to your SiteGround cPanel account and click on the staging icon under the WordPress Tools section.
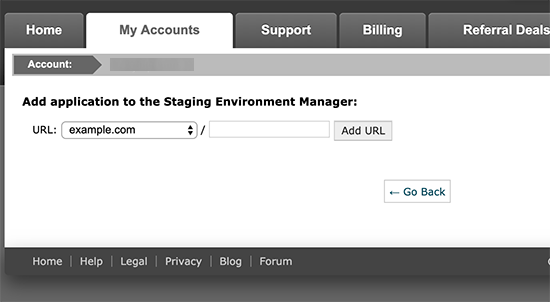
Step-2: Add your WordPress website into the staging site manager, then click on the “Add WordPress” button.

Step-3: Select the URL of your website and create the staging copy of your website.
Step-4: Add a password and provide your login credentials. This is a very important step of the staging process as it not only prevents others from accessing your site but also prevents Google from indexing duplicate content.
Step-5: You can now edit your copy and push it to live after confirmation. If you wish to push the changes to the live website, navigate back to the staging panel, and then click the ‘Manage Staging Copies’ button.

Step-6: Click on the ‘Push to live’ button to push changes from staging to your live website.

How to create a staging site on WP Engine?
Step-1: Login to your WP Engine account and select your website under the ‘Sites’ option on the dashboard.

Step-2: Click on the ‘Add Staging’ option from the left column.

Step-3: Click on the ‘Create New’ tab and name your staging website. Then, click on the ‘Create Environment’ button to create your staging website.

Step-4: As this staging environment is just an empty WordPress site, you need to copy the content of your live website to your staging website.
To do this, first of all, you have to select a backup point that you want to use in your staging website. Then from the left column, click on the ‘Production’ option to switch to your production environment and then click on the ‘Copy to’ button.

Step-5: Select the backup point you want to use for your staging site, then click on the ‘Preview Copy’ button. Complete the process with the Copy Environment step. Your staging website is ready.

Step 6: When you are ready to push the changes from your WordPress staging site to the live site, create a backup point for your staging site through this path- WP Engine » Staging » Backup Points » Backup now. Complete the process by clicking on the ‘Create staging backup’ option.

Once you have taken the backup of your staging website, you can head with the deployment process. Click on the ‘Copy to’ option and select ‘Production’. Select the backup point which you selected at the time of staging and click on Preview copy. Finally, complete the process with the Copy Environment.


- Create your WordPress Staging Website through Plugin
In case you’re not on one of these hosting solutions, then you can still create a staging website using WordPress plugins such as BlogVault, WP Staging, WP Stagecoach, Duplicator, and All-in-One WP Migration. This is an extremely easy way to create your staging website.
Let’s say you choose the WP Stagecoach plugin to create your staging site.
Here are the steps to use plugins to create your WordPress staging website-
Step-1: Install and activate the plugin.
Step-2: As soon as you activate the plugin, you’ll see an additional menu item called WP Stagecoach appear in your admin area. Click it to access the plugin’s Settings page.

Step-3: On the plugin’s Settings page enter the details and create your staging website. Make sure your password protects your staging site to prevent it from getting accessed.

Step-4: Click on the ‘Ride The Stagecoach’ button and that’s it. Upon clicking the button, the admin area will be displayed. Here you can make changes as needed.
Step-5: You can now import changes to your live site by using the ‘Import’ option.

- Create your WordPress Staging Website Manually
If you are a beginner, one of the least recommended ways of staging your WordPress website is to do it manually. Manually staging a website involves a lot of steps, which increases the possibility of errors.
Hence, if you are a novice, you might have a hard time handling the staging process flawlessly. You can, however, use it if you are a WordPress expert with strong roots in the WordPress programming language.
Here are the steps that you can follow to create your WordPress website manually. It is good practice regardless of your level of expertise to take a backup of your site before beginning your staging process.
Step-1: Create a subdomain and FTP account of your staging website
To create a subdomain for your staging website, login to your hosting account, from the dashboard navigate to the subdomain section and create a subdomain by a name, let’s say, staging.

In order to upload the files of your live site to your staging site, you must then create an enabler. To do this, you need an FTP account that corresponds to the subdomain you created for your website, which allows you to upload the file to the staging website.
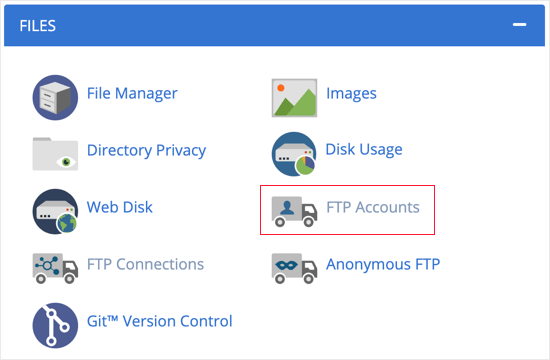
You can create an FTP account in your hosting account by selecting the ‘FTP accounts’ option from the cPanel, entering the details as required, and then clicking “Create”.
Step-2: Create a duplicate copy of your live website and add it to the subdomain
Install and activate the Duplicator plugin on your live site in order to create a duplicate copy of the files on your website. Upon activation, the Duplicator menu will appear in your WordPress admin. Select the Duplicator option, click on create a new option, and ‘build’ the duplicate copy of your file.

Once the duplicate package is built, you can download the files on your computer by selecting the ‘One-click download’ option.

Once downloaded, add the files to the file directory of the subdomain.
Step-3: Create a New Database for your Staging Website
Go to the cPanel of your WordPress hosting account, and select the ‘My SQL Databases’ option and create a new database and a new user and add them to the database to allow them to access the database. Make sure you provide all the privileges to the user so that you can perform tasks as per the requirement.

Step-4: Launch the Duplicator Installer through a Web Browser
To do so you can visit the following link through your browser-
Here, the term ‘yoursubdomainname.example.com’ should be replaced with the actual subdomain. Upon executing this URL, the Duplicator installer wizard is launched.

Do the needful like uploading the archive file, and go through the terms and conditions. Then, click on the Next button and head to installing the database by entering all the required information.

Click on the Next button and update your URL.

Once done, click next and that’s it the duplicator will now finish the migration. Go ahead and make the changes to your staging site as you wish.
Step 5: After your staging site has been updated, you will have to follow the steps outlined above to deploy it to the live server.
- On your staging site, create a new Duplicator package and download the Installer and Archive files.
- Using Duplicator, create a complete backup of WordPress on your live site.
- Once you’ve done this, delete all WordPress files and folders from your live site.
- Last but not least, use the Duplicator installer wizard to import your staging site to the live server by following the above instructions.
Conclusion
We hope you enjoyed our article about how to create a WordPress staging site for testing. If you run a WordPress site, you know how important it is to test any new plugins or themes before you implement them. With a staging site, you can test to see how the theme or plugin will look and perform without risking your live site.
Please let us know how this article helped you create a staging site; we’d love to see your results. Please contact us anytime.